To use the company’s services, you need to configure the Rostelecom router, after which stable access to Wi-Fi will appear. The manufacturer’s manuals have brief setup instructions, but they are often abrupt or not detailed. As a result, the problem is that the user cannot connect to the Internet. All they offer to help in technical support is to order a master at home. Firstly, it’s not fast, and secondly, it’s not free. Our guide, however, aims to help set up Rostelecom’s Internet on the router on its own.
Contents
What is a Rostelecom router?
Together with its Internet service, the provider provides its own router. In fact, there can be many different ones, including Sagemcom, TP-Link, Huawei, D-Link, Keenetic and some others. Their important feature is the combination of a Wi-Fi router and an ADSL modem (most often). However, when connecting an Ethernet cable, simple models without ADSL can also be used.
How to connect and configure a Rostelecom router?
As we have already mentioned, Rostelecom equipment is designed for 2 types of connection: ADSL and Ethernet. Depending on the type of service, the setup instructions will also differ. For this reason, we have divided the instruction into several parts for each type of connection.
ADSL
Detailed instructions for connecting using Sagemcom as an example:
- We are looking for a special DSL port on the back or side panel of the device. It is quite thin and designed for connection via ADSL system. A suitable wire and connector must have been held during installation. We also connect the wire itself to the outlet.
- We connect the first LAN-connector to the computer via cable.
- We connect the router to the network. The connection as a whole is completed, but the Internet setup is still required.
- We enter the admin panel through the computer. You may have to wait a bit for the connection to be established. To do this, we need a browser into which we enter the address 192.168.1.1 or 192.168.0.1. A login window should appear. The default username and password is admin. The login details may differ depending on the model, but they are always indicated on the label on the bottom of the device.
- We open “Advanced settings” in the router menu, and now we need to go to the WAN service. If there is already an entry here, delete it. On the “Layer 2 interface” tab, we also delete the existing entry so that the router loses the ability to use incorrect data.
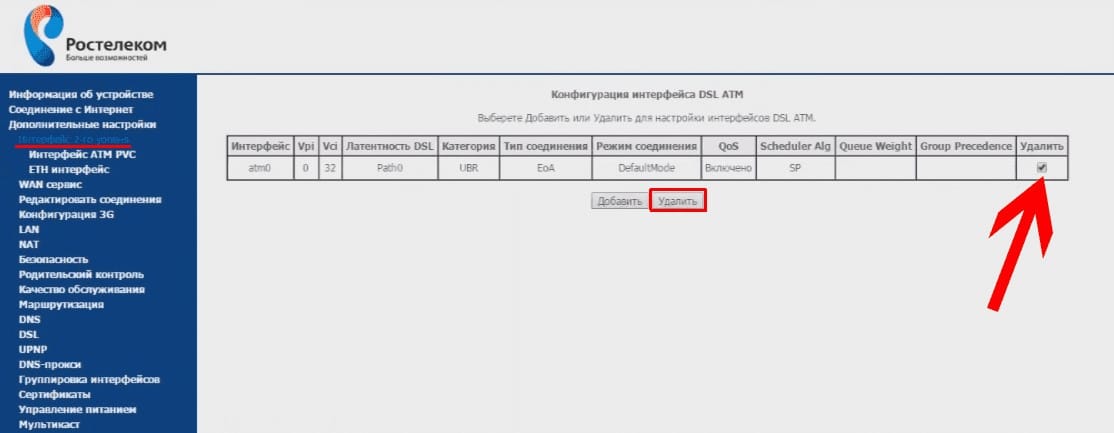
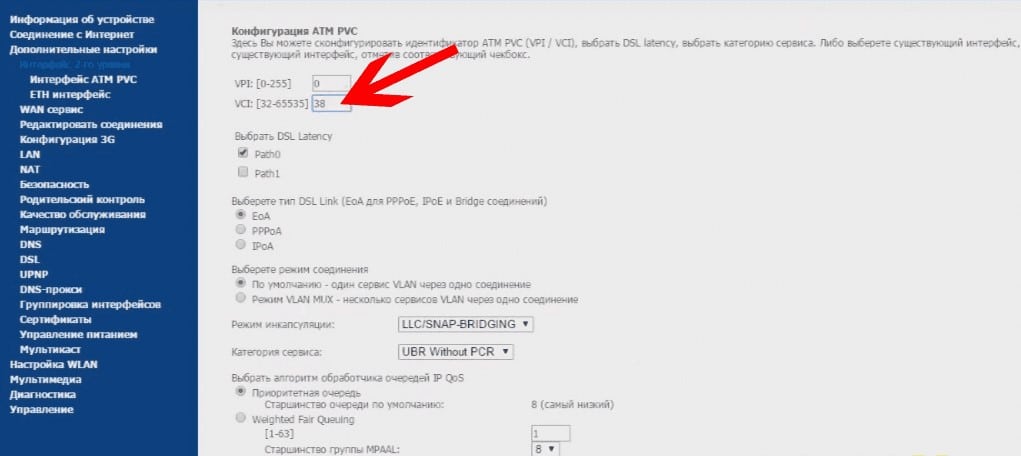
- Click on the “Add” button. First, we save the option with standard settings. The second time we add the connection already with the correct VCI (you need to look at it in the table below, depending on the region.
- We return back to the “WAN service” tab, click on the “Add” button, skip the first window, and in the second, be sure to select “PPP over Ethernet (PPPoE)”.
- We indicate the login, password – they should be provided by the company to the user. “PPPoE Service Name” should be “NET”. We save the connection.
- We add the connection again, but this time the type should be “Bridging”.
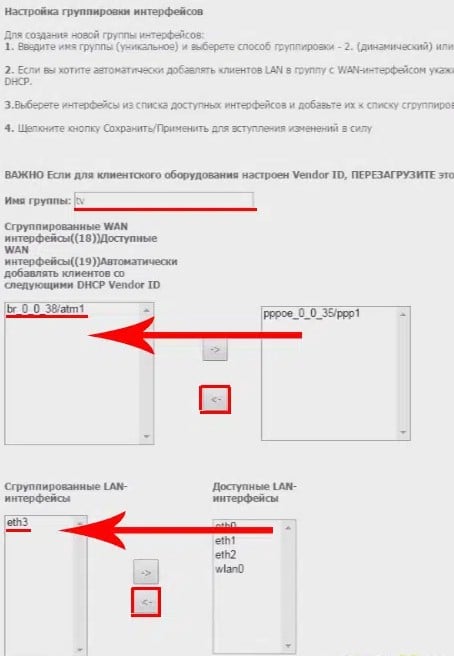
- Go to the Interface Grouping tab and select Add. Main parameters: Group name – TV, parameter br_0_0_38/atm1 should be in the left column (should be moved), and in the second block – eth3 should also be moved to the left block.
- We save the parameters and check the connection.
Already now you can connect devices to a Wi-Fi network, it will work fine.
ethernet
In the case of an Ethernet connection, things are a little simpler:
- We connect the cable from the provider to LAN1, and the wire to the PC – to LAN2.
- We enter the settings of the router (4 step of the previous guide).
- On the “Advanced settings” tab, select the “ETH-interface” section and click “Add”.
- Switch to WLAN MAX mode and save.
- In the “WAN service” column, add 2 PPPoE and Bridging settings, similar to the previous instruction.
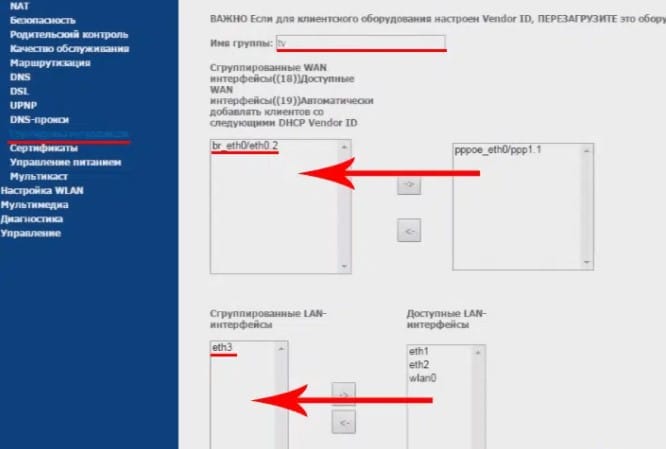
- On the “Interface grouping” tab, specify the name “TV”, and mix 2 elements in the left columns: “br_eth0 / eth0.2” and “eth3”.
- Ready.
After connecting the smartphone to the network, you can enter the admin panel through the phone, too, using a browser, the address 192.168.1.1 or 192.168.0.1 and a login with a password.
Features of connecting different routers to Rostelecom
It is often possible to set up a Rostelecom Wi-Fi router on other routers with even less effort. The general principle is similar, but the names of the items may differ slightly. Let’s briefly consider the features for each of them.
TP Link
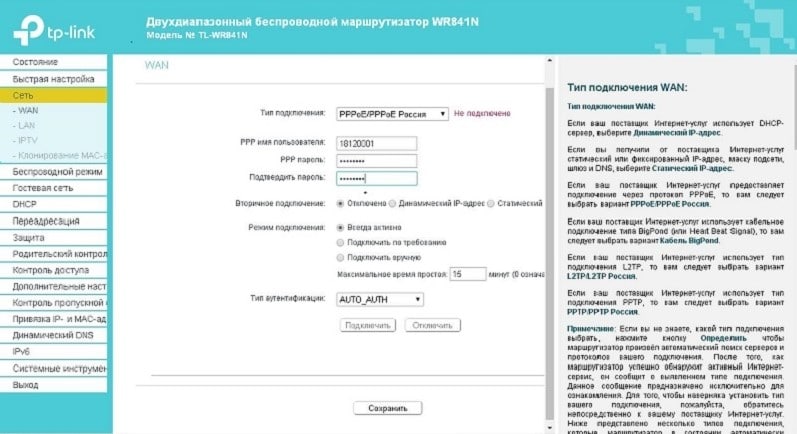
How to set up a TP-Link router for Rostelecom:
- We connect the cables and enter the admin panel (look for the data on the sticker of the device).
- Go to “Network” in the “WAN” section and set the PPPoE option.
- Specify the login with the password from the provider and save the settings.
TP-Link is valued around the world for its ease of setup. Although they have models with “Fast Setup” in their assortment, there is nothing difficult when connecting any manufacturer’s device.
Huawei
Very often, the Huawei HG8245H model is supplied. The principle is the same as on TP-Link: connect the cables, enter the admin panel, select the WAN option and specify the data from the provider.
Advice! You can set up a Rostelecom router for another provider without much effort. You will simply be provided with other data from the provider, most likely, another Internet cable will also be extended.
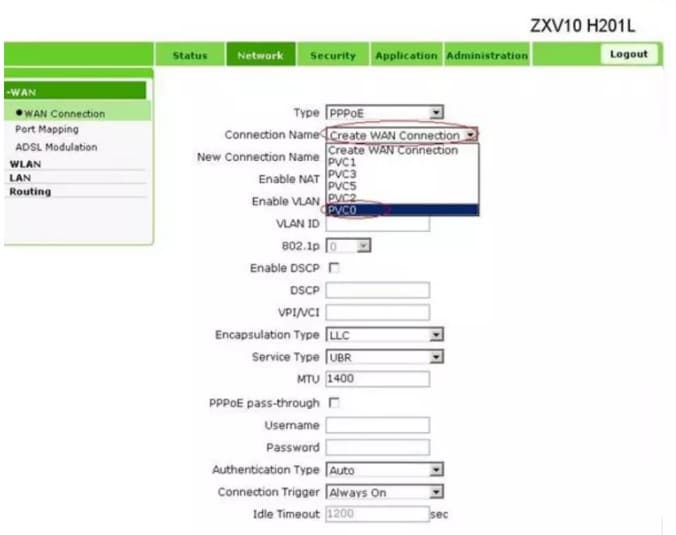
ZTE
ZTE router setup procedure:
- We connect the cables and the settings menu should start on its own.
- We indicate the Internet Setup option, where we select PPPoE and activate all checkboxes, except for the third one.
- Makes a login with a Rostelecom password and save the changes.
- You can try to connect now, but most often you need to restart the device.
D-Link
The principle remains the same: connecting cables, entering the interface (the wizard can also open automatically), and in the advanced settings we select WAN. After specifying the connection data, everything should work. However, on some models, you should also go to the “Port” section and name the connection “Ports: 5.2”. Reboot after completion of work is also desirable.
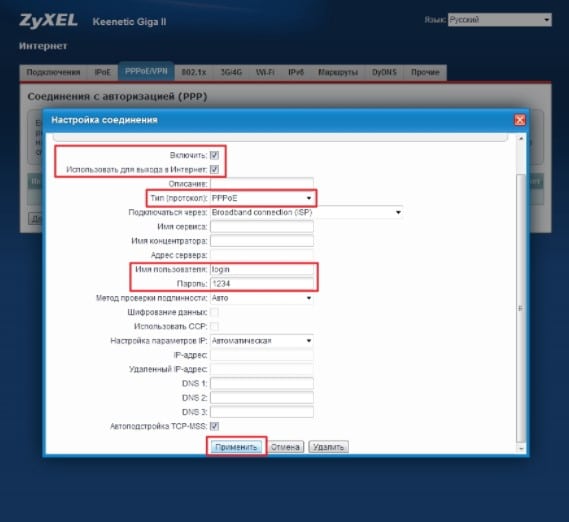
Keenetic
Setting instructions:
- Standard connection and access to settings.
- On the “LLC” tab, select “Turn on the Internet” and click on the “Yes” button.
- “Protocol type” – PPPoE, “Connect via” – WAN.
- Enter the name and password.
How to set up a Rostelecom Wi-Fi router?
After completing the above procedures, your Wi-Fi will work, but at standard settings. Sometimes you need to personalize the network more flexibly: set up port forwarding, change the password or connection name, update the firmware, set up connection filtering, etc. We will not consider all the procedures, since this is too long, but we will list the main parameters below.
Basic parameters
The most basic settings you’ll most likely want to tweak are:
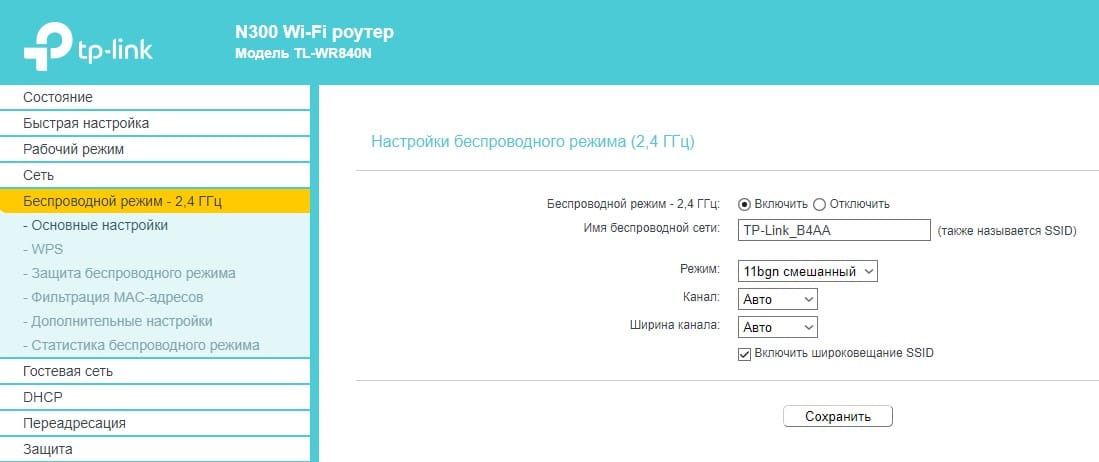
- In the “Basic Settings” section (more often located inside the “Wireless Mode” tab), on the same TP-Link, specify the network name. Also the mode (it is better to leave mixed) and the width of the channel. There is also a channel selection, the “Auto” setting works well, but if you need to speed up the network as much as possible, it’s worth looking for the freest, least loaded channel manually.
- Switch to the “Wireless Security” mode. It is better to leave the WPA / WPA2 personal standard as it is, as well as encryption, but the version and password can be changed. Again, this is optional.
- In the DHCP section, we can specify a more correct DNS, gateway and IP address.
Port settings
In most cases, you can configure the ports on the Rostelecom router as follows:
- Go to the “Forwarding” tab in the “Virtual Servers” subsection.
- Click on the “Add” button and specify the port that you want to open, as well as the IP address of the device.
- We set the protocol and enable the rule.
- Done, the redirect works. This way you can configure many ports.

However, some ports may be closed due to server settings by Rostelecom.
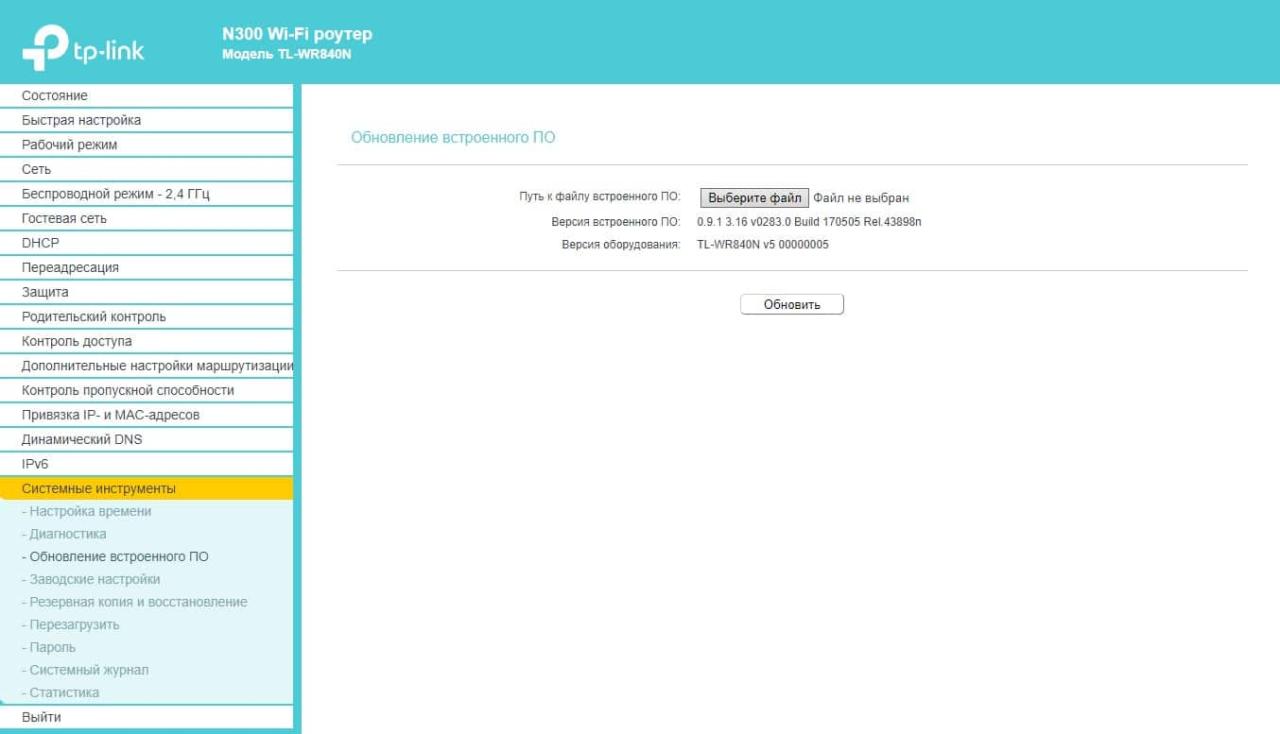
Firmware update
How the update works:
- We go to the official website of the manufacturer to the “Support” page and download the software for your router model. It is important to pay attention to the version of the router.
- Unzip the file if it is in the archive.
- Open the router settings – “System Tools” – “Firmware Update”.
- Click on the “Select file” button and specify the path to the file. It is important that the connection between the router and the PC is via cable.
- Click on the “Update” button.
Problems with setting up and connecting to Rostelecom
Here are some common situations that prevent you from completing the setup:
- Unable to open router settings page . You need to turn off your VPN or proxy. You may also enter the address incorrectly, look for it on a sticker on the bottom of the case.
- Login with password does not match . It may have already been changed manually. If there is no way to find out, it remains only to reset the password. To do this, you need to hold down the “Reset” button on the case for 7-10 seconds.
- Lost internet after factory reset . You need to reconfigure.
- Doesn’t connect to the internet . Most likely you did something wrong, we advise you to study the instructions again. It may also be worth looking at the YouTube manual for your specific router model.
Done, you managed to set up the Rostelecom router and now you have Wi-Fi available in the house for different devices. We hope everything went smoothly. If you have additional difficulties, you can ask your questions in the comments.